
How To Disable Automatic Updates On Windows 10
It provides all the steps required to turn off, stop or disable automatic updates on Windows 10.
On a fresh install, Windows 10 keeps on upgrading and downloading the applications on the Windows Store. It also regularly check for Windows updates and start downloading and installing the updates without user consent which might not be the ideal scenario. Sometimes, it occupies the screen for some time on start/restart and starts upgrading itself, forcing users to watch the upgrade which is quite annoying. This tutorial provides the steps to turn off the automatic updates of the Windows Store applications and defer the automatic update of Windows.
Windows Store
Click the Store Icon on the Taskbar, click the three dots on the top right corner and click Settings Menu Item as highlighted in Fig 1.

Fig 1
Now turn-off the automatic updates as highlighted in Fig 2.

Fig 2
This will stop the Microsoft Store from upgrading the existing applications and save some download bandwidth.
Metered Connection
We can also instruct windows for limited usage of the bandwidth by turning on the metered connection. Click the Windows Icon at the bottom left of the Taskbar and click the Settings Icon as shown in Fig 3.
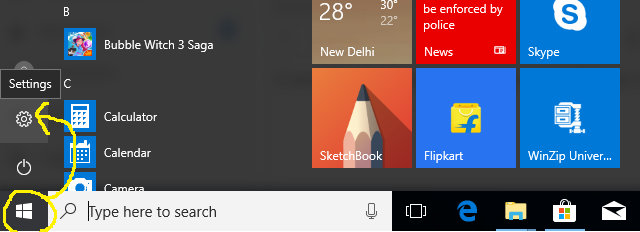
Fig 3
It will open the Settings Panel as shown in Fig 4.
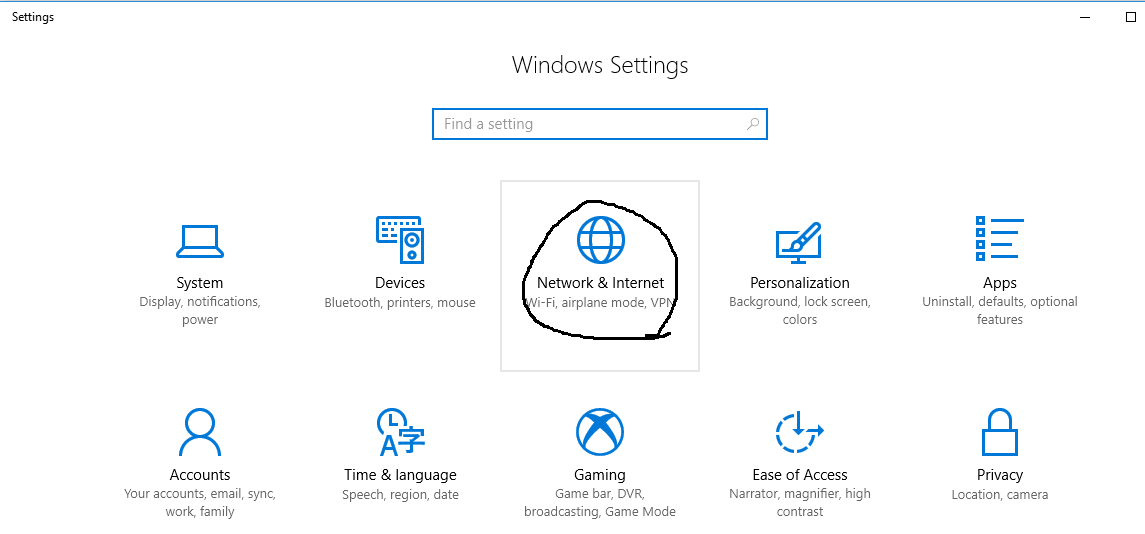
Fig 4
Now click the Network and Internet Option as highlighted in Fig 4. It will open the connection properties as shown in Fig 5.
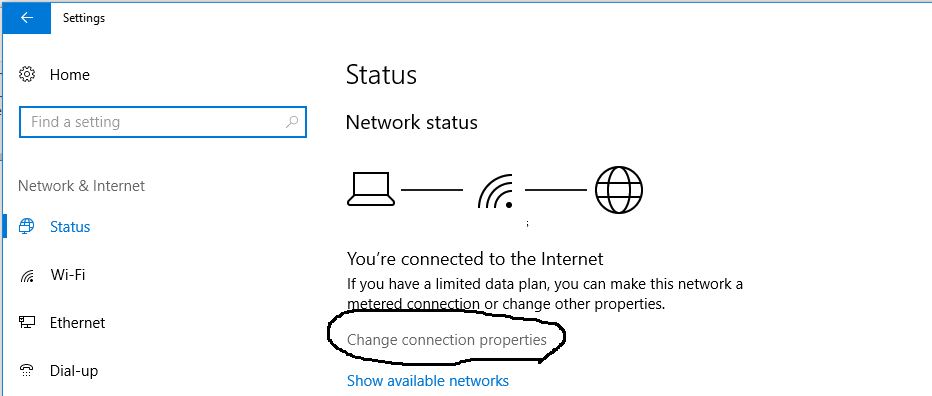
Fig 5
Click the Change connection properties Link as highlighted in Fig 5. It will show the connection properties as shown in Fig 6.
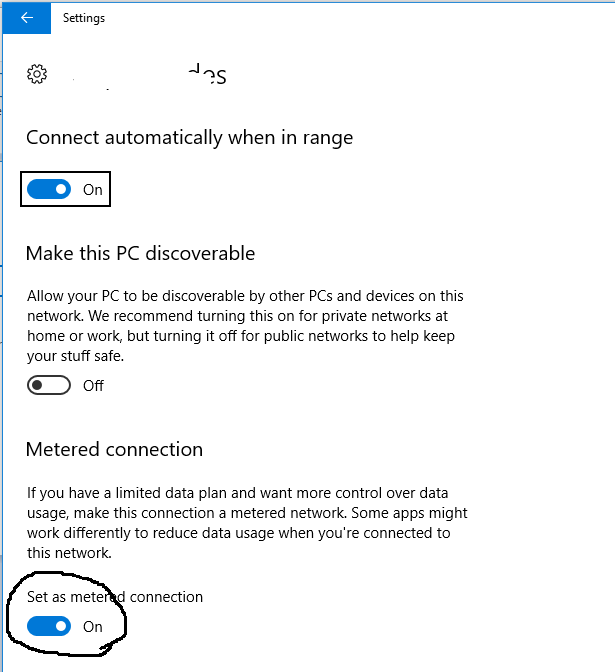
Fig 6
Now turn on the Metered connection as highlighted in Fig 6. This will limit internet usage through several apps.
Defer Windows Automatic Updates
We can also defer the automatic updates for some time to avoid the auto-update without user consent. Again open the Settings Panel and click the Update & security Option as highlighted in Fig 7.
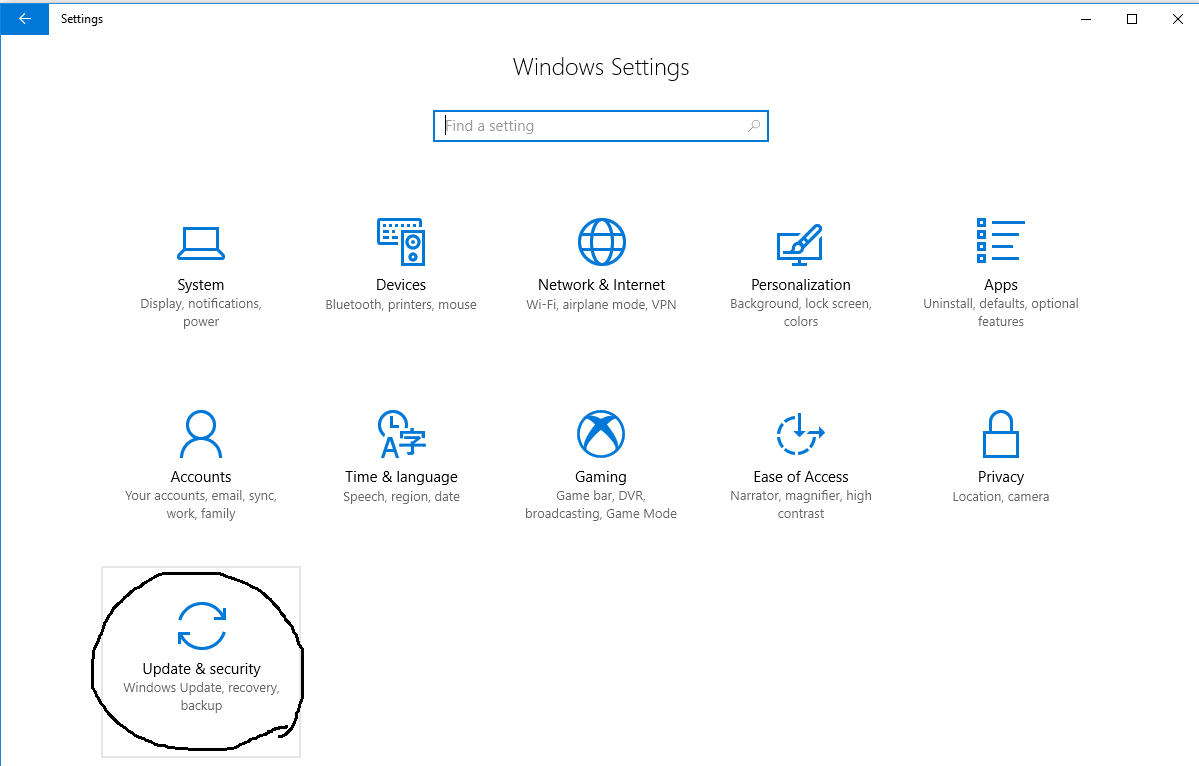
Fig 7
It will open the Windows update Panel as shown in Fig 8.
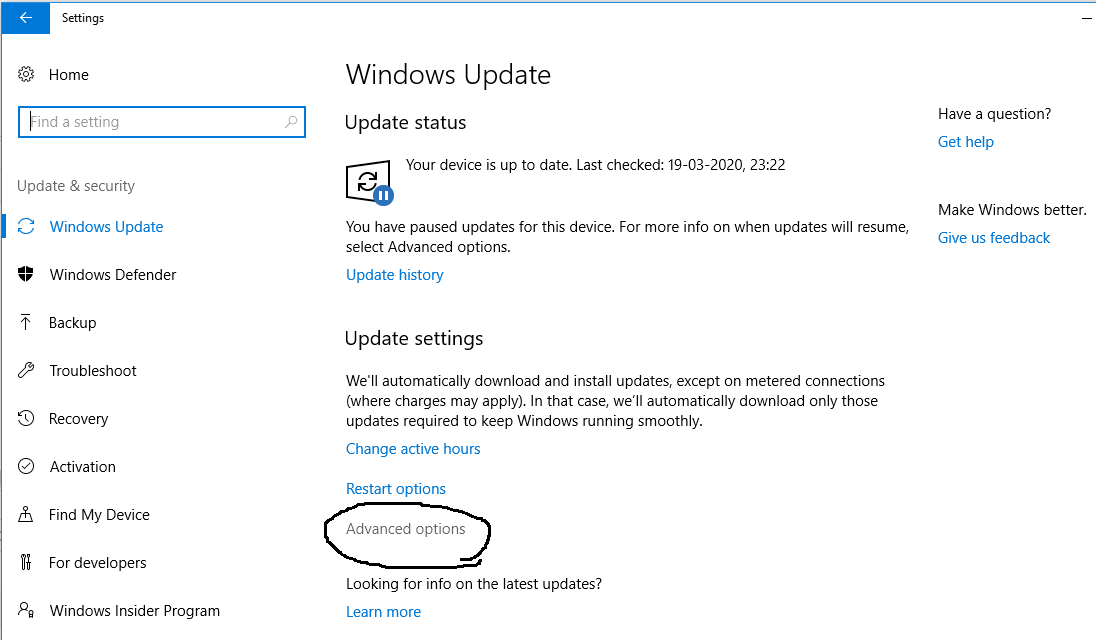
Fig 8
Now click the Advanded option as highlighted in Fig 8. It will open the Advanced option Panel as shown in Fig 9.
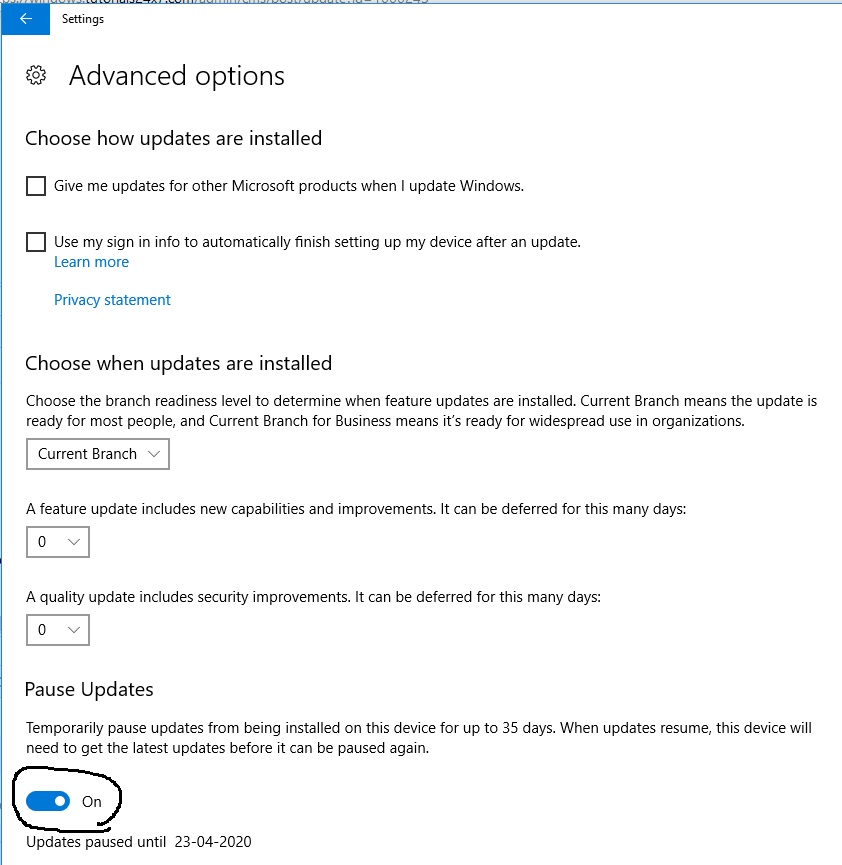
Fig 9
We can pause the updates for up to 35 days as highlighted in Fig 9.
Disable Windows Update Service
We can also disable the Windows Update Service to check for updates at all. This will restrict Windows from updating itself, though we can manually check for updates using the Windows Update Settings. Search for Run as shown in Fig 10.
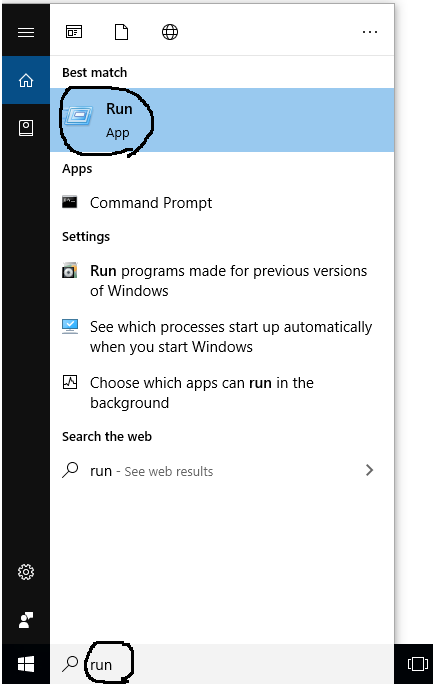
Fig 10
Click the Run App as highlighted in Fig 10. It will open the Run Panel as shown in Fig 11.
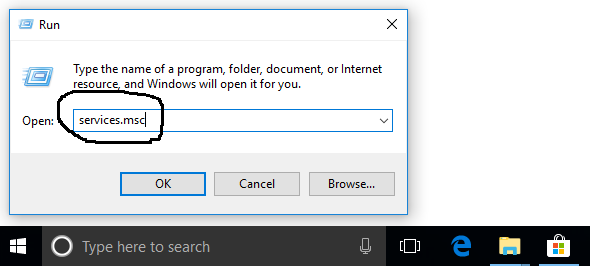
Fig 11
Now type services.msc in the input field and click the OK Button. It will open the Services Panel as shown in Fig 12.
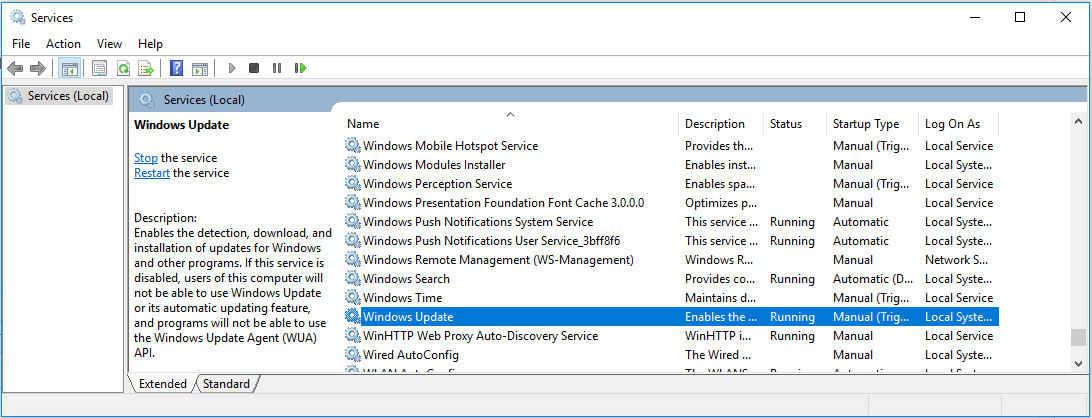
Fig 12
I have highlighted the Windows Update service in Fig 12. Now double click the highlighted option. It will open the Service Properties Dialog as shown in Fig 13.
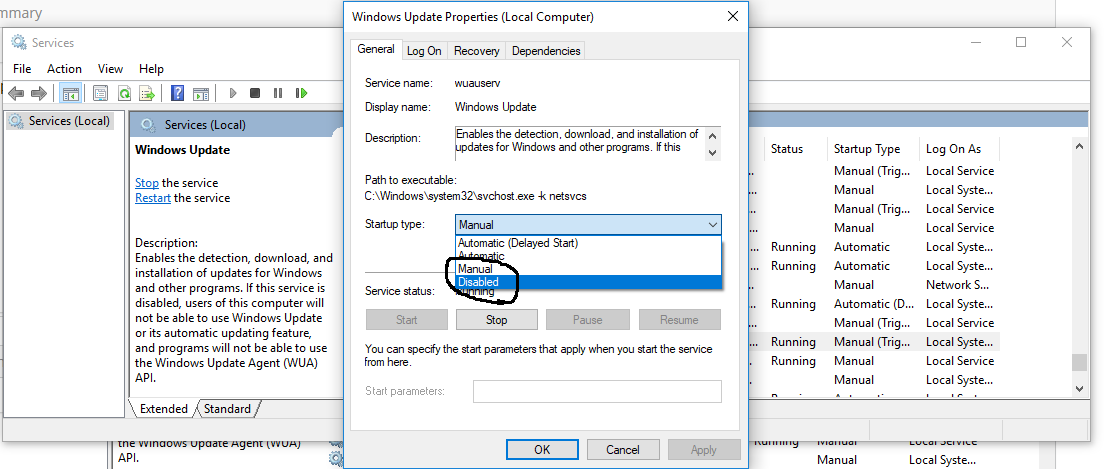
Fig 13
Now change the Startup type to Disabled and click the Apply Button to apply the changes. Click the OK Button to close the dialog. This will disable the Windows Update Service. Now restart the system.
Group Policy Editor
We can make changes to the Group Policy Editor on Windows 10 Education, Pro and Enterprise editions. This option is not available for Windows 10 Home users. Though the security updates will be installed automatically, windows will notify for the other updates which can be installed by manual action.
Open the Run Panel and type gpedit.msc in the Input Field and click the OK Button. It will open the Local Group Policy Editor as shown in Fig 14.
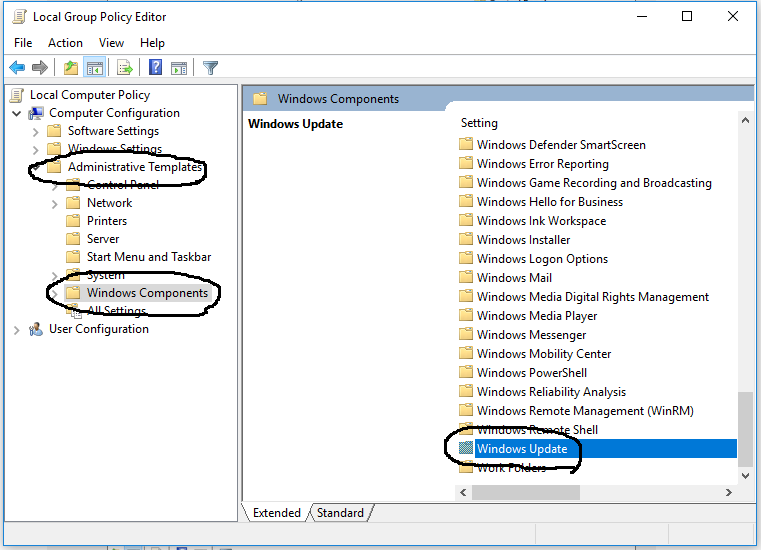
Fig 14
Expand the Administrative Templates and click the Windows Components on the left panel as highlighted in Fig 14. Now double click the Windows Update component as highlighted in Fig 14. It will show the possible options as shown in Fig 15.
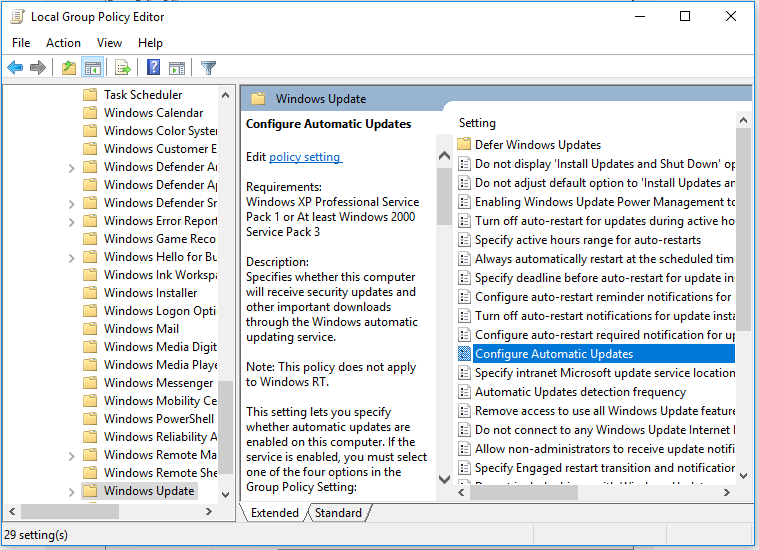
Fig 15
Double click the Configure Automatic Updates Option as highlighted in Fig 15. Apply the configurations as highlighted in Fig 16.
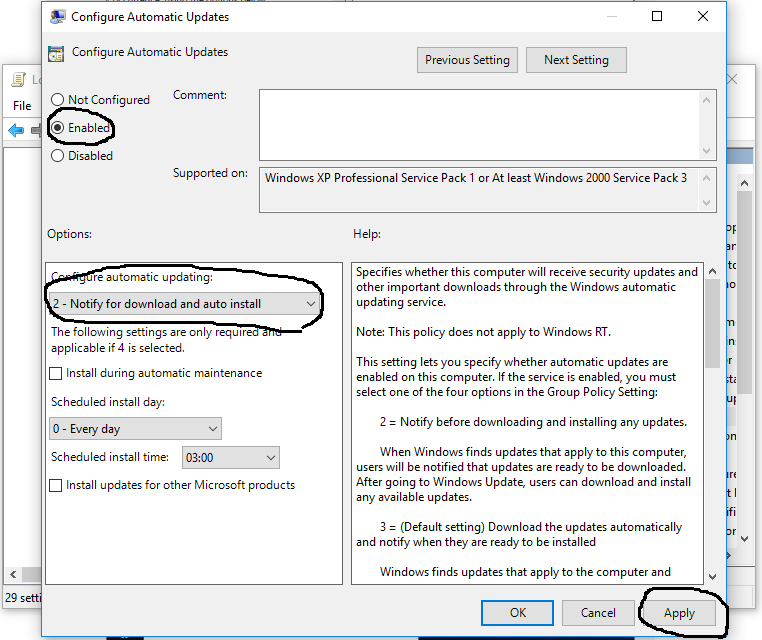
Fig 16
Click the OK Button after applying the configurations as highlighted in Fig 16. Now Windows won't download the updates automatically except the Security Updates.
Summary
This tutorial provided the options to turn off automatic updates where possible, limit the auto-usage of the internet bandwidth, and defer or disable the automatic updates of Windows. You may join the discussion by submitting your comments using the options as shown below.


